iOS Adaptive Layouts in Code
Matthew Sanders posted an excellent article in September 2014 on Adaptive Layouts for iPhone 6. It was written as an instructive piece so I followed along in Xcode 6 recreating the examples using Interface Builder to produce views and auto layout constraints visually.

The last half of the article focused on building an adaptive layout for a hypothetical Instagram interface that shifted information in landscape orientation. I replicated the final results using Interface Builder however I was not impressed by the tediousness of installing, finding, adjusting, and inspecting auto layout constraints visually across multiple size class traits.
The purpose of this article is to illustrate how that adaptive Instagram interface can be recreated in code. I’ll be using Masonry, a light-weight layout framework which wraps Auto Layout with a nicer syntax.
Simple Squares
To illustrate the succinct layout DSL provided by Masonry we can recreate the coloured squares example from the first half of Matthew’s article.
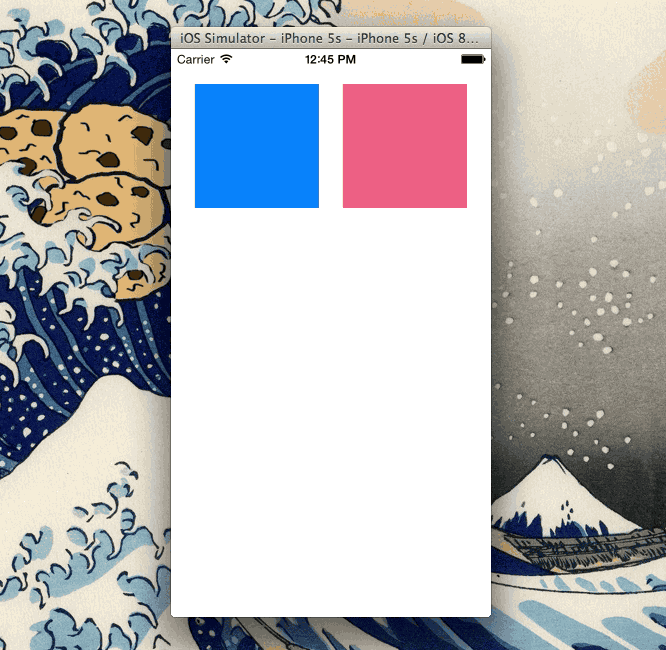
The code snippet below creates the Auto Layout constraints for the coloured squares in the UIView method updateConstraints. The chainable expressive syntax of Masonry shines through. The entire view code is available as working example on my github.
- (void)updateConstraints
{
    UIView *superView = self;
    UIEdgeInsets padding = UIEdgeInsetsMake(20, 20, 0, 20);

    [self.blueSquareView mas_makeConstraints:^(MASConstraintMaker *make) {

        // Make the view a square
        make.height.equalTo(self.blueSquareView.mas_width);

        // Pin the view to the superview
        make.top.and.left.equalTo(superView).with.insets(padding);

        // Make the blue square width equal to the pink square
        make.width.equalTo(self.pinkSquareView);

        // Pin the blue square right edge to the pink square left edge
        make.right.equalTo(self.pinkSquareView.mas_left).with.offset(-20);
    }];

    [self.pinkSquareView mas_makeConstraints:^(MASConstraintMaker *make) {

        make.top.and.right.equalTo(superView).with.insets(padding);
        make.height.equalTo(self.pinkSquareView.mas_width);
    }];

    [super updateConstraints];
}
Adaptive Instagram Example
Recreating the adaptive layout for Matthew’s hypothetical Instagram interface was straightforward. You can follow along in Xcode by cloning the source for this app from my github.

The graphic below denotes the four main subviews of our hypothetical Instagram application. The challenge will be to manage layout constraints in code as the size class traits change during device rotation.
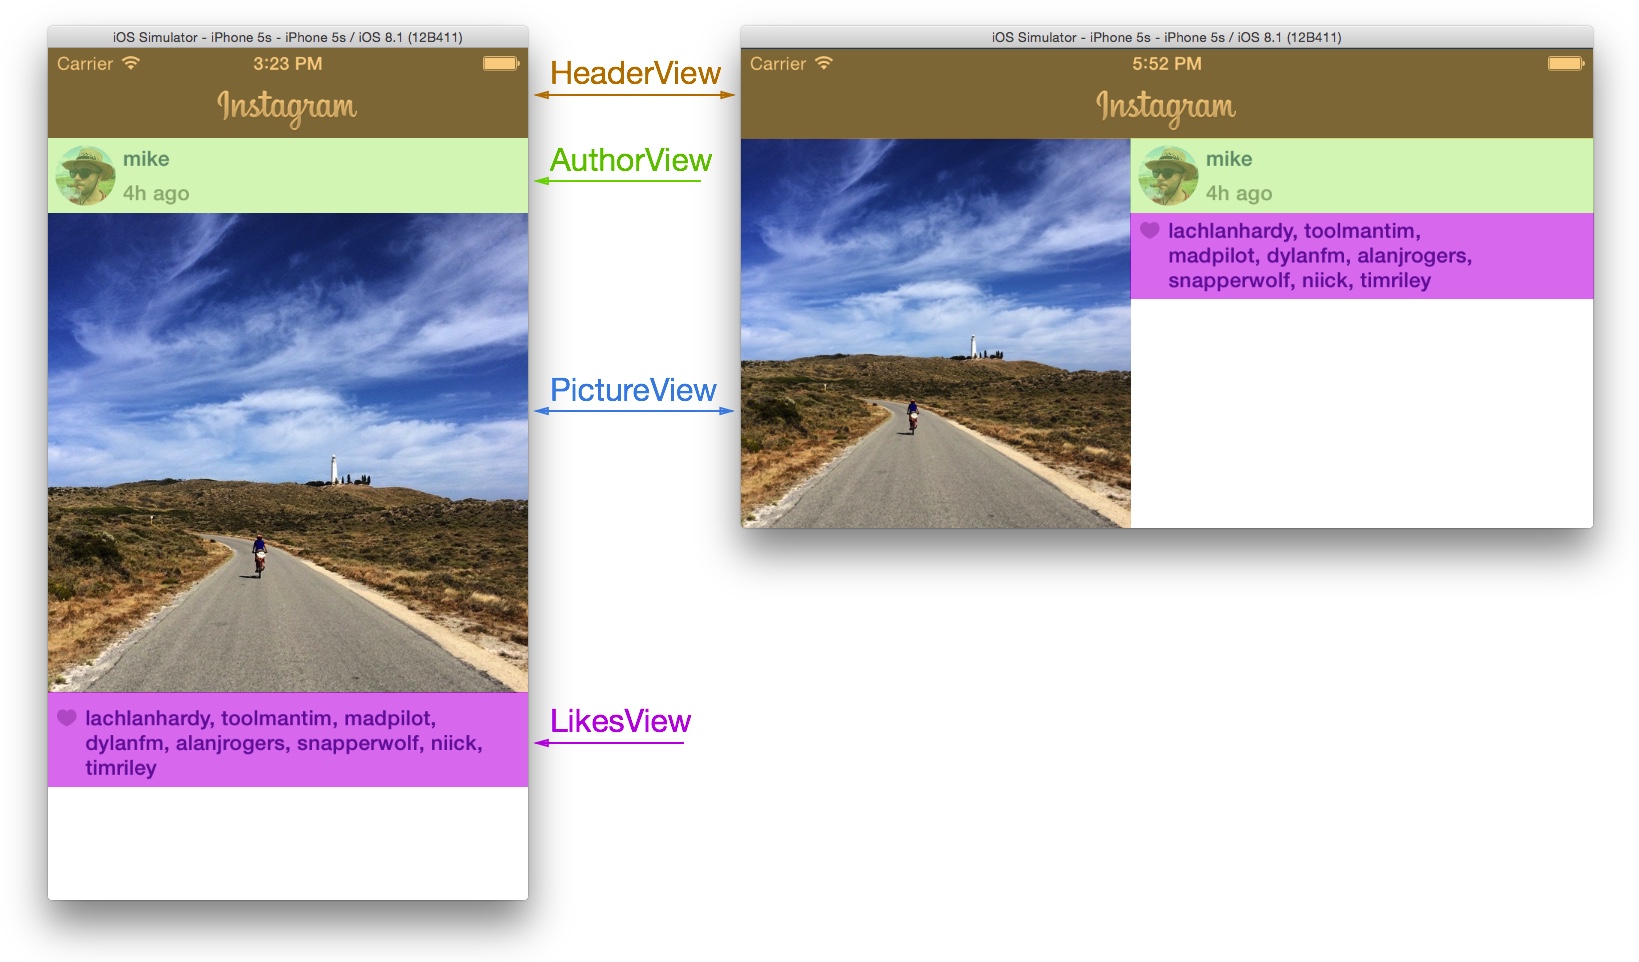
When the interface layout changes to landscape our constraints must slide the AuthorView to the right, and move the LikesView rightwards and upwards. The PictureView will remove its full width constraint meanwhile the HeaderView maintains its layout in both orientations. This process must be reversed as the phone rotates back to portrait orientation.
Note: As of iOS8 all rotation-related methods are deprecated. Instead rotations are treated as a change in the size of the view controller’s view. So when we talk about rotations and orientatons we’re really talking about changes in size class traits which are part of the new
UITraitCollectionclass.
Generic Constraints
Our first task is to install the constraints for the generic size class, and by generic we mean constraints which apply for both regular and compact size class traits. For Matthew’s article which uses Interface Builder this corresponds to the any-width any-height setting.
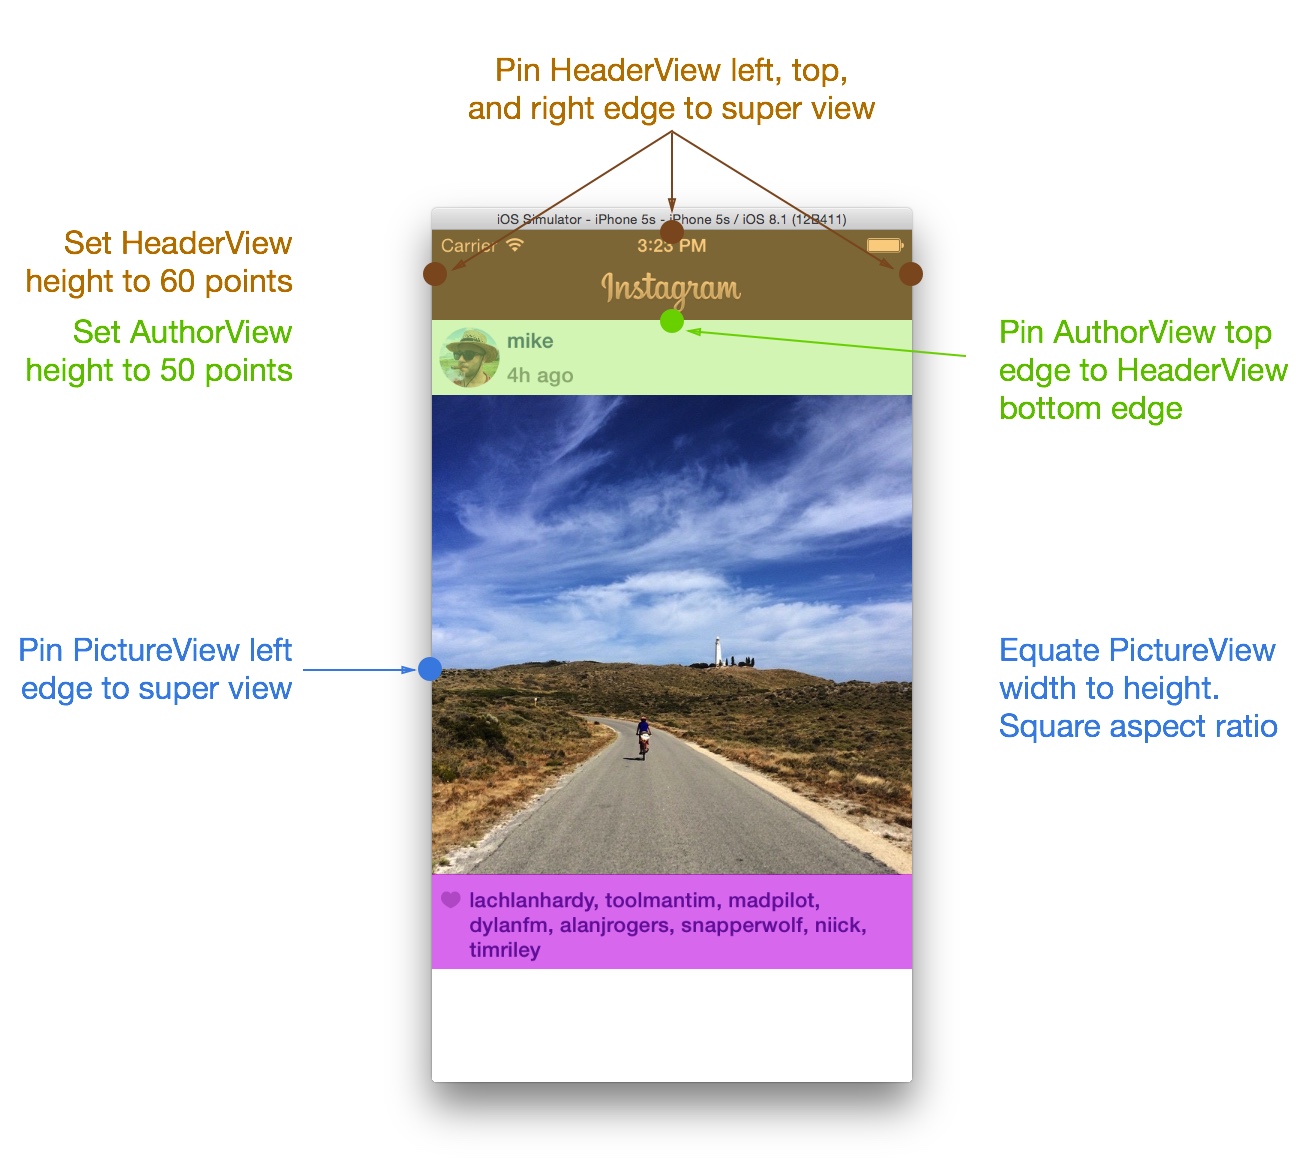
As seen in the generic constraints graphic above, the HeaderView has a fixed height and its left, right, and top edges are pinned to the super view. Our PictureView will always be displayed as a square so we define a constraint equating its height and width. The AuthorView will also have a fixed height and its top edge will always be pinned to the bottom edge of the HeaderView.
The following view controller function when called will create and install these generic constraints.
- (void)installGenericConstraints
{
    [self.headerView mas_makeConstraints:^(MASConstraintMaker *make) {
        make.height.equalTo(@60);
        make.left.right.and.top.equalTo(self.view);
    }];

    [self.pictureView mas_makeConstraints:^(MASConstraintMaker *make) {
        make.height.equalTo(self.pictureView.mas_width);
        make.left.equalTo(self.view);
    }];

    [self.authorView mas_makeConstraints:^(MASConstraintMaker *make) {
        addObject:make.height.equalTo(@50);
        make.top.equalTo(self.headerView.mas_bottom);
    }];
}
Portrait Constraints
The next step is to install the constraints relevant only for the portrait orientation. Determining which constraints are required is a process of filling-in-the-blanks from the generic constraints illustration.
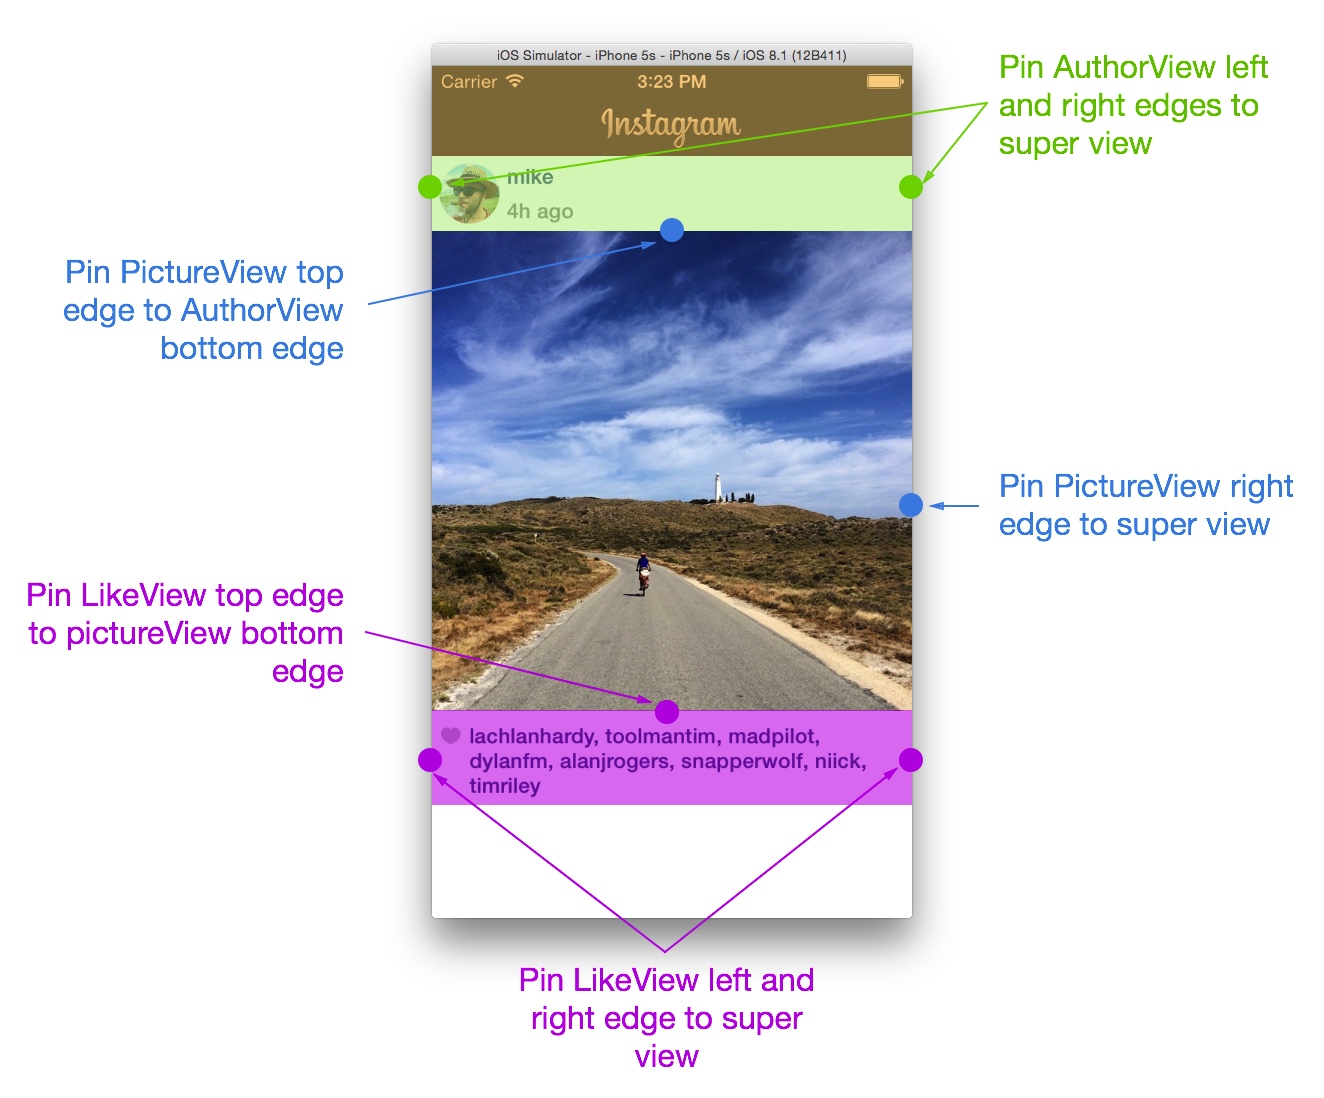
The portrait specific constraints include pinning the AuthorView left and right edges to the super view, which makes it span the full width. Pin the top and right edge of the PictureView to the bottom of the AuthorView and the right edge of the superview respectively. The LikesView does not have any generic constraints so defining them is straightforward: pin its top edge to the bottom of the PictureView and pin its left and right edges to the superview which makes it span the full width.
The following view controller function creates the portrait layout constraints. The Masonry constraint maker MASConstraintMaker conveniently returns the constraint created which we add to an array property. We’ll use this array later to uninstall the constraints as the device changes orientation.
- (void)installPhonePortraitConstraints
{
    NSMutableArray *constraints = [[NSMutableArray alloc] init];

    [self.authorView mas_makeConstraints:^(MASConstraintMaker *make) {
        [constraints addObject:make.left.and.right.equalTo(self.view)];
    }];

    [self.pictureView mas_makeConstraints:^(MASConstraintMaker *make) {
        [constraints addObject:make.top.equalTo(self.authorView.mas_bottom)];
        [constraints addObject:make.right.equalTo(self.view)];
    }];

    [self.likesView mas_makeConstraints:^(MASConstraintMaker *make) {
        [constraints addObject:make.top.equalTo(self.pictureView.mas_bottom).with.offset(5)];
        [constraints addObject:make.left.and.right.equalTo(self.view)];
    }];

    self.phonePortraitConstraints = [constraints copy];
}
Landscape Constraints
The next step is to install the constraints relevant only to landscape orientation. Again determining which constraints are required is a process of filling-in-the-blanks from the generic constraints illustration.
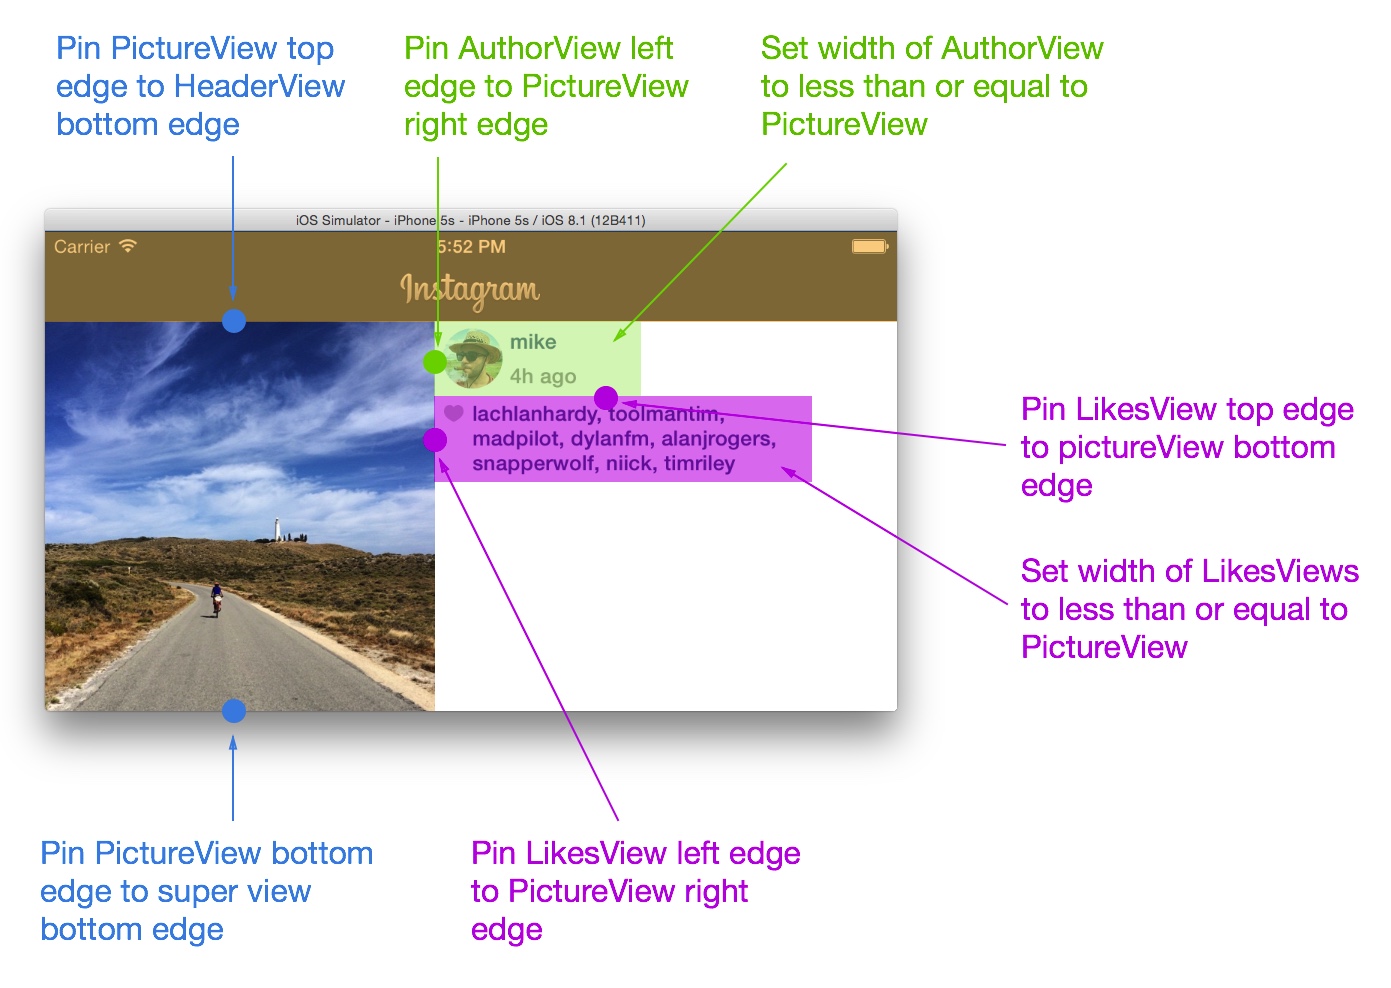
The landscape specific constraints include pinning the PictureView top and bottom edges to the HeaderView bottom edge and super view bottom edge respectively. The left edge of the AuthorView is pinned to the right edge of the PictureView. The LikesView top and left edges are pinned to the AuthorView top edge and PictureView left edge respectively.
Attempting to pin the right edge of the AuthorView and LikesView to the super view will lead to unsatisfiable constraints. The less-than-or-equal-to width constraint allows the views to expand to the intrinsic width of their subviews.
The following view controller function creates the landscape layout constraints. Once again we store the constraints in a view controller array property which we’ll use later to uninstall the constraints.
- (void)installPhoneLandscapeConstraints
{
    NSMutableArray *constraints = [[NSMutableArray alloc] init];

    [self.authorView mas_makeConstraints:^(MASConstraintMaker *make) {
        [constraints addObject:make.left.equalTo(self.pictureView.mas_right)];
        [constraints addObject:make.width.lessThanOrEqualTo(self.pictureView)];
    }];

    [self.pictureView mas_makeConstraints:^(MASConstraintMaker *make) {
        [constraints addObject:make.top.equalTo(self.headerView.mas_bottom)];
        [constraints addObject:make.bottom.equalTo(self.view)];
    }];

    [self.likesView mas_makeConstraints:^(MASConstraintMaker *make) {
        [constraints addObject:make.top.equalTo(self.authorView.mas_bottom)];
        [constraints addObject:make.left.equalTo(self.pictureView.mas_right)];
        [constraints addObject:make.width.lessThanOrEqualTo(self.pictureView)];
    }];

    self.phoneLandscapeConstraints = [constraints copy];
}
Toggling Constraints
The functions we just discussed are concerned with creating constraints. As mentioned earlier the challenge will be to manage layout constraints as the size class traits change during device rotation.
The following function when called will install the constraints matching the device orientation for a trait collection and uninstall the constraints which are no longer relevant. The uninstall prefixed helper methods are simply uninstalling the constraints which we stored a reference to earlier.
- (void)toggleConstraintsForTraitCollection:(UITraitCollection *)traitCollection
{
    if ([traitCollection mk_matchesPhoneLandscape]) {

        [self uninstallPhonePortraitConstraints];
        [self installPhoneLandscapeConstraints];

    }
    else if ([traitCollection mk_matchesPhonePortrait]) {

        [self uninstallPhoneLandscapeConstraints];
        [self installPhonePortraitConstraints];
    }

    [self updateViewConstraints];
}

- (void)uninstallPhonePortraitConstraints
{
    for (MASConstraint *constraint in self.phonePortraitConstraints) {
        [constraint uninstall];
    }
}

- (void)uninstallPhoneLandscapeConstraints
{
    for (MASConstraint *constraint in self.phoneLandscapeConstraints) {
        [constraint uninstall];
    }
}
Note: Helper methods
mk_matchesPhoneLandscapeandmk_matchesPhonePortraitare from a category onUITraitCollection, see source on my github.
Note: This approach results in the constraints getting installed, uninstalled, and reinstalled as the device rotates back and forth. An alternative approach could be the
activateanddeactiveapi methods forMASConstrainthowever it just didn’t work for me. Your results may vary.
Wiring the View Controller
Connecting all this up to our view controller is straightforward, all the heavy lifting is covered by the previous helper methods.
Override the UIViewController template method updateViewConstraints and install the generic constraints which will always be active. Then call helper method toggleConstraintsForTraitCollection: which will install constraints for the current size class traits.
#pragma mark UIViewController template methods

- (void)updateViewConstraints
{
    if (!self.didSetConstraints) {

        self.didSetConstraints = YES;
        [self installGenericConstraints];
        [self toggleConstraintsForTraitCollection:self.traitCollection];
    }

    [super updateViewConstraints];
}
Note: There’s a potential problem with
updateViewConstraintsas it can be called more than once when the view initialises and when the size class traits change during rotation. We guard against double installation of constraints with a flag which from my research seems to be current best practice.
The final step is to implement protocol method viewWillTransitionToSize:withTransitionCoordinator: which communicates changes in size class traits for the view controller. Its body calls helper method toggleConstraintsForTraitCollection: which will install and uninstall constraints as required.
#pragma mark UIContentContainer protocol methods

- (void)willTransitionToTraitCollection:(UITraitCollection *)newCollection withTransitionCoordinator:(id<UIViewControllerTransitionCoordinator>)coordinator
{
    [self toggleConstraintsForTraitCollection:newCollection];
}
Final Remarks
Working with Auto Layout and adapting your interfaces to different screen sizes for iOS is more important that ever. Using Interface Builder and Storyboards will get you a long way, and I’m not suggesting that you banish them from your workflow. However for all but the most simple of applications you will need to get into the trenches and write layout constraints in code. I hope this article will help you in that task.
You can download the source for this app from my github for reference.
If you have any questions or comments please do get in touch.
Updates
Soon after drafting this post I watched a keynote on React Native which I highly recommend. The promise React Native holds is a declarative approach to defining our views and their layouts. This means the code is written in such a way that it describes what you want to do, and not how you want to do it.
Andy Matuschak a former UIKIt author put it simply in his tweet.
I say with confidence as a former UIKit author: React's model for the UI layer is vastly better than UIKit's. React Native is a *huge* deal.
— Andy Matuschak (@andy_matuschak) January 28, 2015Josh Abernathy also wrote a short and sharp post on why reactive native matters.