Decoding MAVLink Messages with Swift
Last August I purchased a Pixhawk autopilot for micro UAV research purposes.
Pixhawk is an autopilot for fixed wing and multirotor air vehicles. It packs an impressive array of sensors including a gyroscope, magnetometer, and barometer. The entire software stack is open source. It includes a real time operating system, flight middleware, and ground control station.
Communication with Pixhawk occurs according to the MAVLink protocol. MAVLink defines a set of messages enabling duplex communication between Pixhawk and a ground station. Pixhawk can inform a ground station of an air vehicle’s status. Likewise a ground station can send messages to query or alter the air vehicle’s behavior.
This article will show how to decode MAVLink messages using a Swift based Xcode project. This is of interest if you’re attempting to write your own ground control station software for the Mac (or iOS).
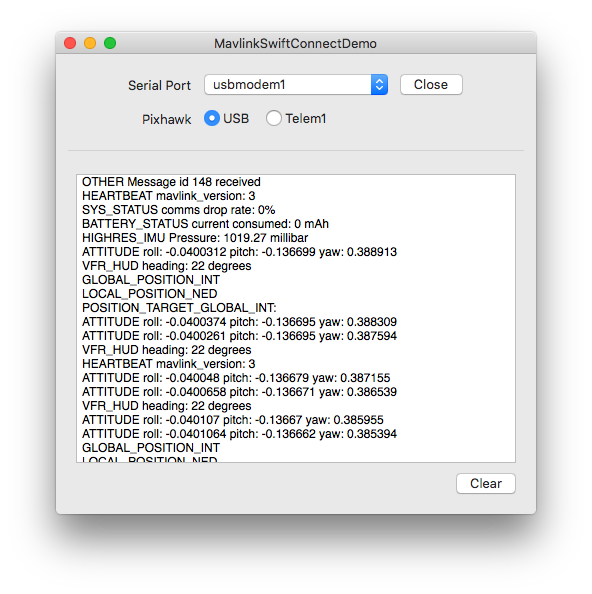
A full sample Xcode project for this article is available from my GitHub. Follow the brief instructions in the README to get the app running.
MAVLink C Library
The MAVLink GitHub project defines a set of protocol messages in XML. Python scripts within the project convert those XML files into language-specific libraries. Language options include C, C#, Java, JavaScipt, Python, and Lua. For an Xcode project use the auto generated C library which has it’s own GitHub project.
To get the MAVLink C library working within an Xcode project you’ll need to follow three steps:
Clone the C Library as Git Submodule
Add the C library to an Xcode project as a git submodule. Submodules are the lowest common denominator of dependency management. It makes it easy to pull in the frequent upstream updates to MAVLink. I prefer to use a Vendor sub directory for third-party libraries. Add the submodule with the following command:
git submodule add https://github.com/mavlink/c_library.git Vendor/MavlinkCreate a Clang Module
Bridging headers are one way of making C code available in a Swift project. A Clang module is another method which is better in this case. Create a Modules subdirectory and add a module.map file with the following contents:
module Mavlink [system] {
    header "../Vendor/Mavlink/common/mavlink.h"
    export *
}
Add Module Path to Xcode
The final step is to inform Xcode of the module. Add the module to the the project setting Import Paths located under Swift Compiler. Use ${SRCROOT} in the module path (e.g. ${SRCROOT}/Modules) so that the project works no matter where it’s checked out.
With that all done you can import the MAVLink library at the top of any Swift file with the following statement:
import MavlinkReading the MAVLink byte stream
MAVLink message transmission occurs as a stream of bytes. This is ideal for duplex communication over a radio modem.
To decode messages sent by Pixhawk we’ll need to read a stream of bytes from a serial port interface. The painful way involves using Apple’s I/O Kit. The easy way is to use Andrew Madsen’s modern serial port library for Swift OS X apps, ORSSerialPort.
You can communicate with Pixhawk over USB, Bluetooth or radio telemetry. Regardless of which method you choose, ORSSerialPort provides a simple API to communicate with Pixhawk.
There are a multitude of ways to install ORSSerialPort into your Xcode project. The sample project for this article uses the Carthage dependency manager. Instructions for bootstrapping the dependency are in the README file.
Detecting Mavlink Packets
The sample project details how to detect and connect to Pixhawk’s serial interfaces. It’s straightforward when using ORSSerialPort.
Prior to opening a serial port interface to Pixhawk, configure the baud rate, stop bits, and parity with the values listed below. The sample project uses stored property observers to achieve this.
var serialPort: ORSSerialPort? {
    didSet {
        oldValue?.close()
        oldValue?.delegate = nil
        serialPort?.delegate = self
        serialPort?.baudRate = 57600
        serialPort?.numberOfStopBits = 1
        serialPort?.parity = .None
    }
}
Once the serial port is open, a delegate method will notify your application that bytes are available for parsing.
Pass the value of each byte to the MAVLink helper method mavlink_parse_char()
// ORSSerialPort delegate method
func serialPort(serialPort: ORSSerialPort, didReceiveData data: NSData) {
    var bytes = [UInt8](count: data.length, repeatedValue: 0)
    data.getBytes(&bytes, length: data.length)

    for byte in bytes {
        var message = mavlink_message_t()
        var status = mavlink_status_t()
        let channel = UInt8(MAVLINK_COMM_1.rawValue)
        if mavlink_parse_char(channel, byte, &message, &status) != 0 {
          // MAVLink packet detected, decode here
        }
    }
}
If mavlink_parse_char() returns with a truthy value, it means a MAVLink packet has been plucked from the byte stream. The packet is placed in a struct of type mavlink_message_t.
/* Source https://github.com/mavlink/c_library/blob/master/mavlink_types.h */
MAVPACKED(
typedef struct __mavlink_message {
    uint16_t checksum; ///< sent at end of packet
    uint8_t magic;   ///< protocol magic marker
    uint8_t len;     ///< Length of payload
    uint8_t seq;     ///< Sequence of packet
    uint8_t sysid;   ///< ID of message sender system/aircraft
    uint8_t compid;  ///< ID of the message sender component
    uint8_t msgid;   ///< ID of message in payload
    uint64_t payload64[(MAVLINK_MAX_PAYLOAD_LEN+MAVLINK_NUM_CHECKSUM_BYTES+7)/8];
}) mavlink_message_t;
The most important detail here is the packet msgid and payload. For a detailed anatomy of a MAVLink packet refer to the Pixhawk website.
Decoding Mavlink Messages
The discerning attribute of the packet is it’s msgid. Each type of MAVLink message has a unique id. For example, the heartbeat message has value 0 and the attitude message value 30.
Each MAVLink message has an accompanying struct and decode method. To decode the heartbeat message we use a mavlink_heartbeat_t struct and the mavlink_msg_heartbeat_decode() method.
var heartbeat = mavlink_heartbeat_t()
mavlink_msg_heartbeat_decode(&message, &heartbeat);
print(heartbeat.mavlink_version)
Likewise decoding an attitude message requires a mavlink_attitude_t struct and method mavlink_msg_attitude_decode().
var attitude = mavlink_attitude_t()
mavlink_msg_attitude_decode(&message, &attitude)
print("ATTITUDE roll: \(attitude.roll) pitch: \(attitude.pitch) yaw: \(attitude.yaw)")
The sample project uses a switch statement on the message id to decode a variety of MAVLink messages. These are then printed to a text area for viewing.
For a list of common message ids and their meaning refer to the Pixhawk website. The C library headers are the definitive place to discern what a message id means.
Notes when using sample project
The sample project is only tested with an authentic 3DR Pixhawk running PX4 firmware. Communication with 3DR bluetooth and radio telemetry requires a connection to telemetry port 1.