MAVLink Radio Telemetry for iOS
I’m envious of Android. You can install Tower from the Google Play Store, plug in a USB OTG cable connected to an SiK radio and viola! Long range telemetry for micro UAVs.
Sadly this simplicity doesn’t exist for iOS. Simply stated, iOS doesn’t provide the required operating system level libraries to communicate with serial port interfaces such as those on SiK radios. You could attempt to join Apple’s MFi program but unless you’re a company who intends to develop an accessory you’re out of luck.
This article will demonstrate how to build an inexpensive Bluetooth bridge between an SiK radio and an iOS app. This will be of interest if you’re building telemetry or ground control station software for iOS.

Hardware
Solving radio telemetry for iOS involves hardware, and at the core of the solution is an ingenious bit of kit from RedBearLab named BLE Mini.
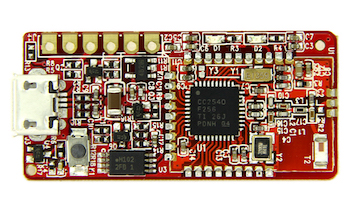
Other common Bluetooth modules are simple serial port adapters over Bluetooth, however these are useless for iOS. In contrast, BLE mini provides a Bluetooth peripheral service and a set of characteristics which bridge communication with a serial port connected to its pin headers.
Using Apple’s Core Bluetooth framework we can connect to the BLE Mini peripheral, and discover its associated service and characteristics. Through these characteristics we can read and write serial port data and also alter the baud rate.
If you’re unfamiliar with Bluetooth fundamentals I recommend reading the Core Bluetooth Overview section of the Core Bluetooth Programming Guide.
SiK Radio Ground Station
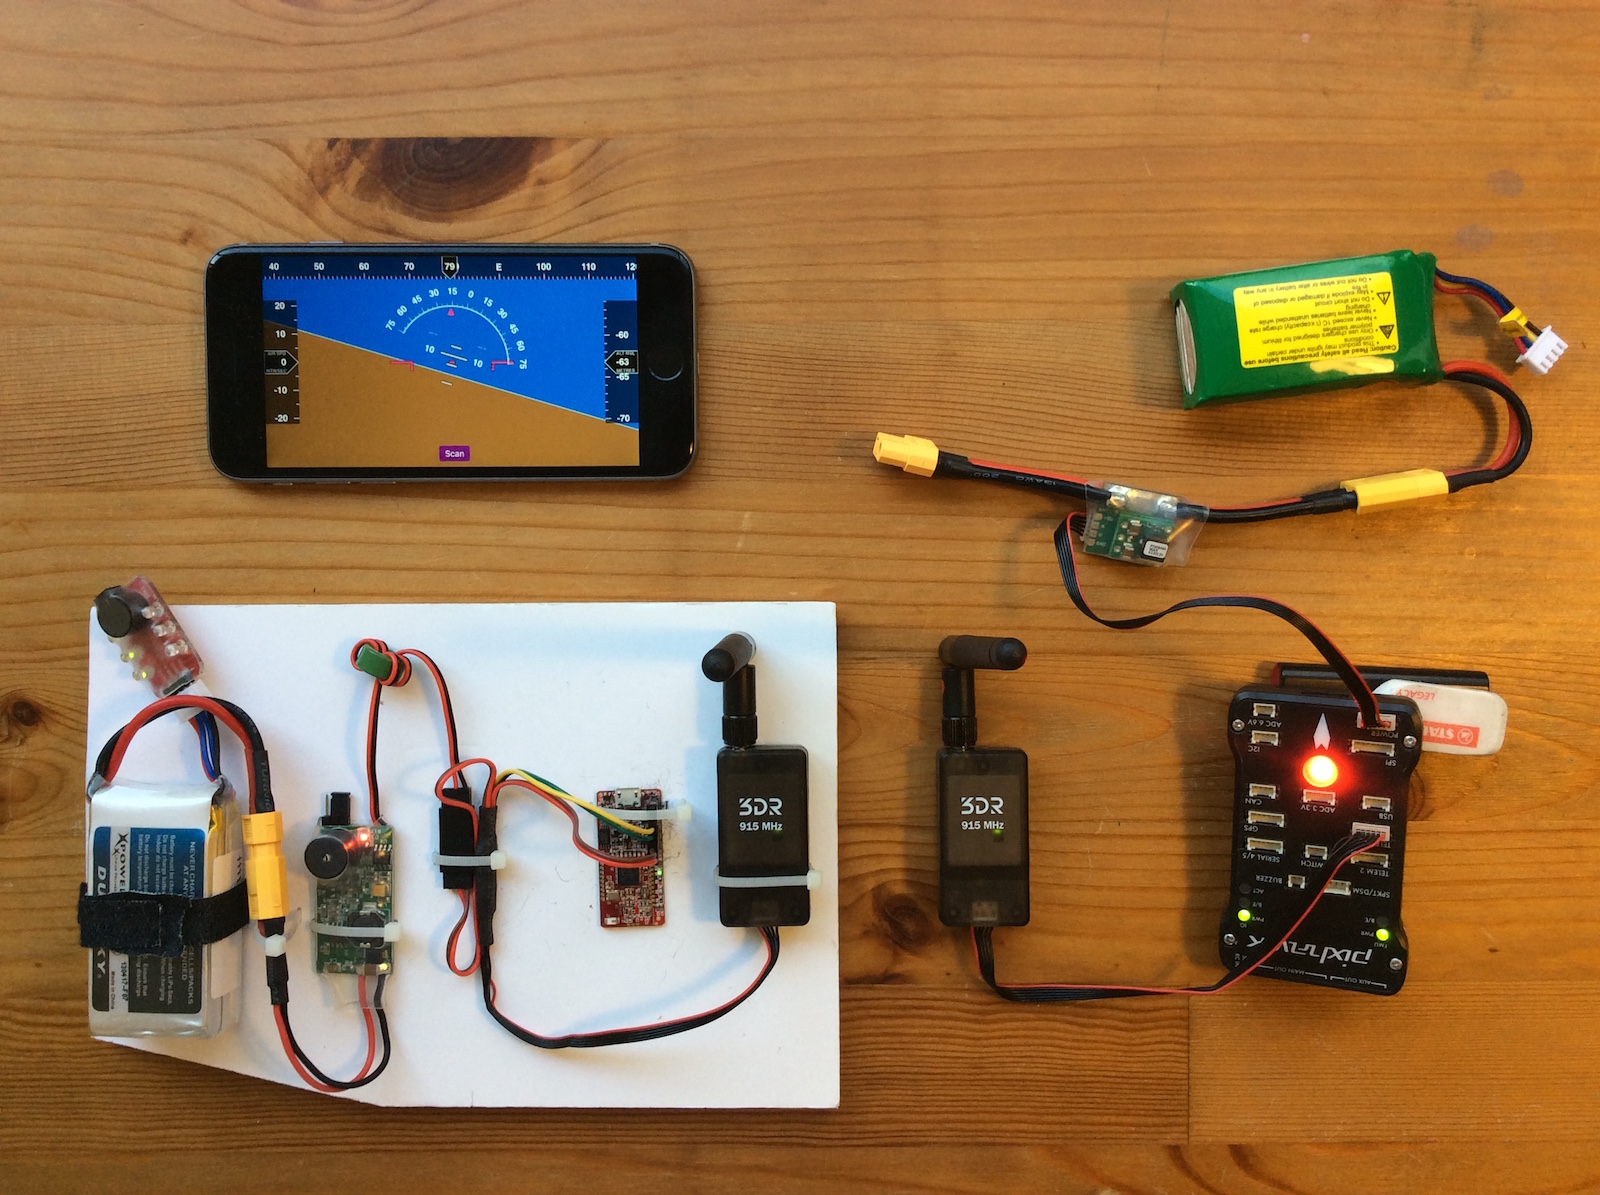
Illustrated in the image below is the ground-based radio station I constructed for this project. The SiK radio will communicate with an air vehicle, and an iPad or iPhone will communicate with the BLE Mini over Bluetooth Low Energy 4.0.
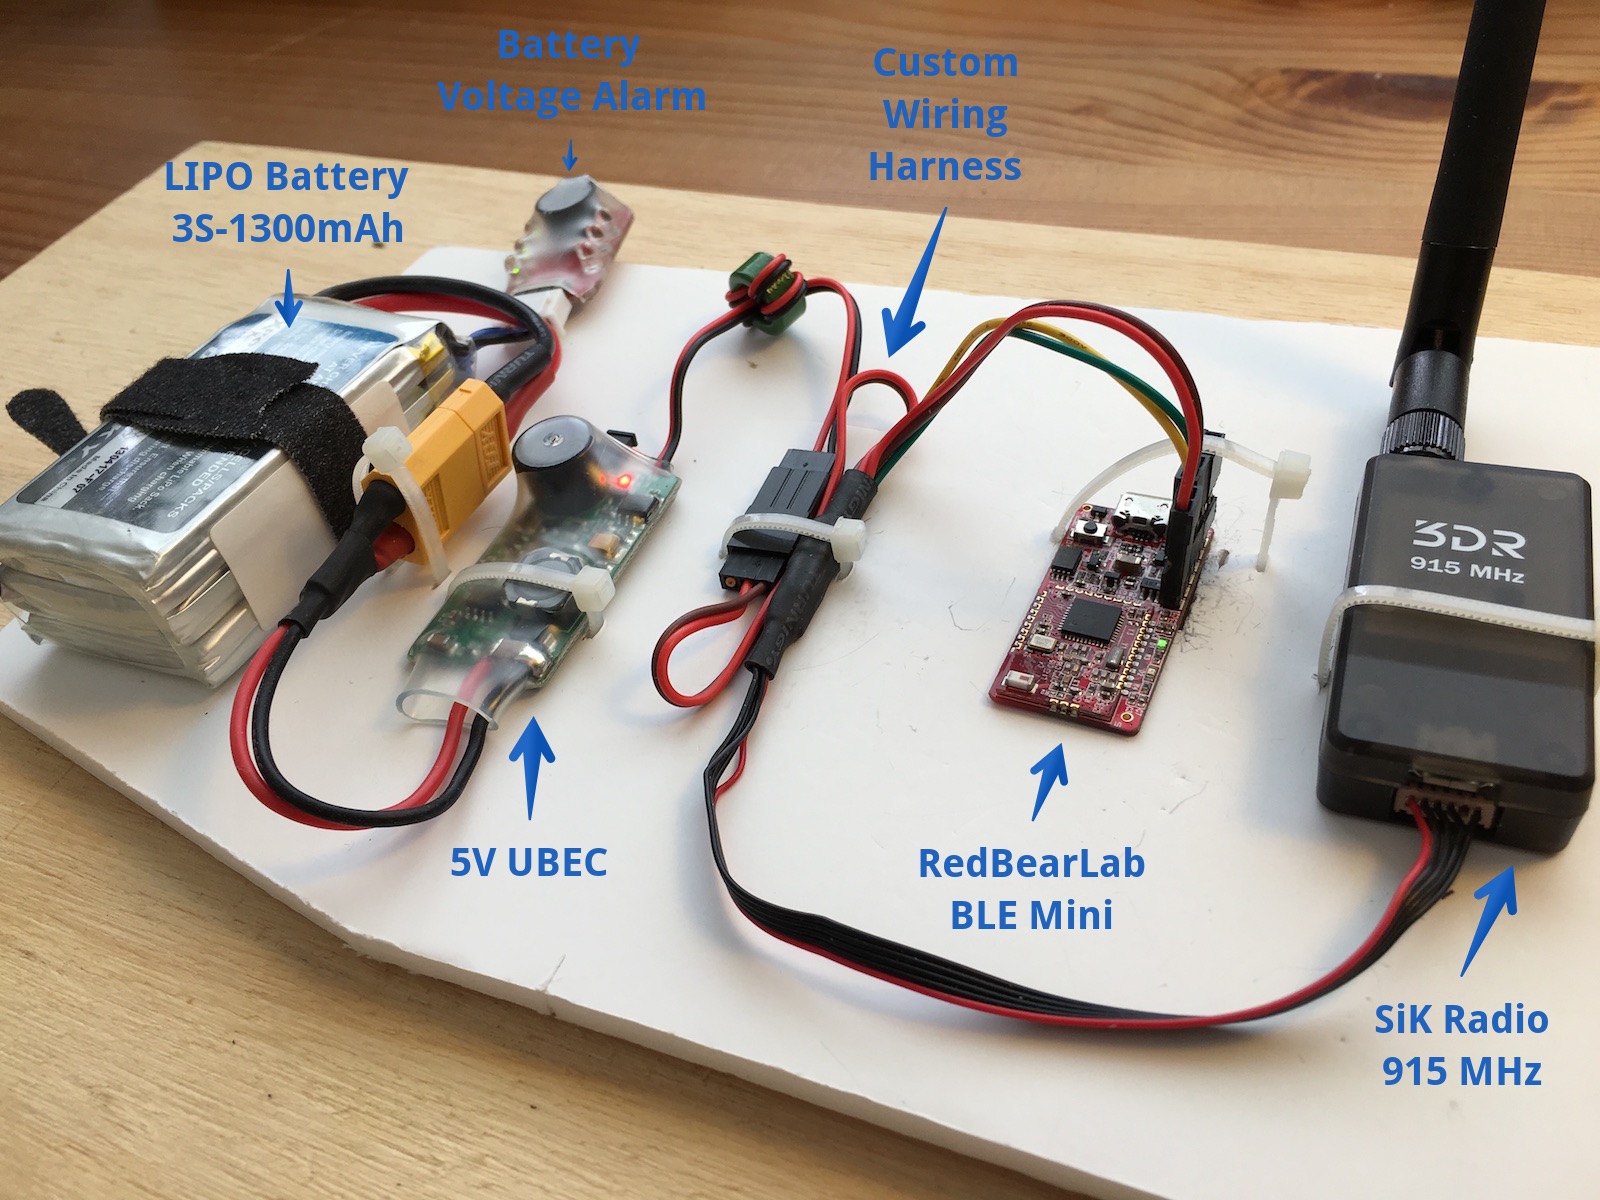
Power is provided to the the SiK radio and BLE Mini courtesy of a 5V UBEC. The TX / RX pins on the SiK radio are connected to the RX / TX pins on the BLE mini respectively. Connecting all the components together is a custom wiring harness described in the following section.
Wiring Harness for SiK Radio & BLE Mini
At the core of the custom wiring harness for the ground-based radio station is a DF13 six-pin connector cable for the SiK radio.
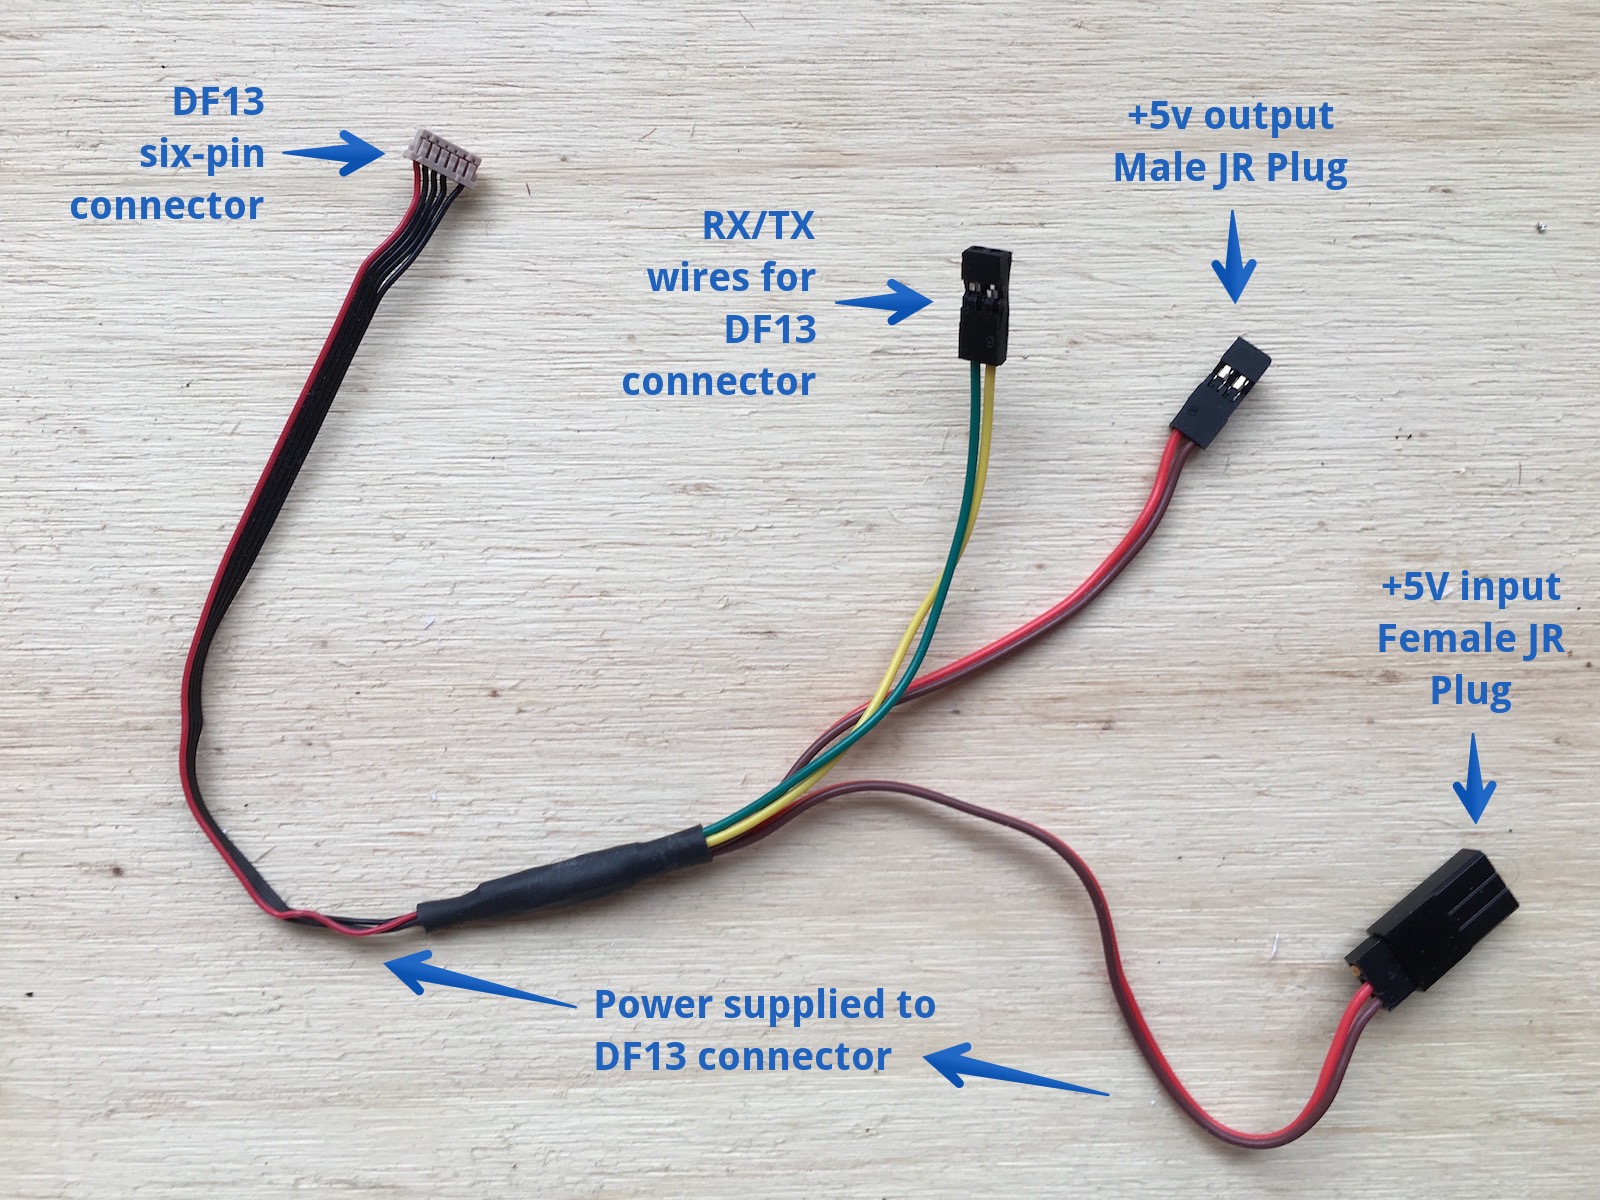
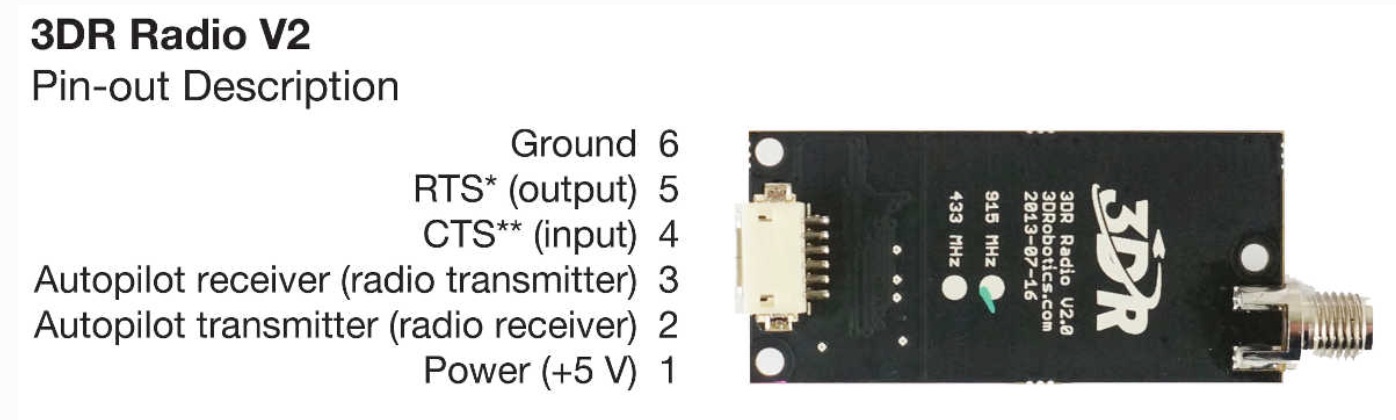
Take care when connecting wires from the DF13 cable to the rest of the wiring harness. Follow the pinout diagram from the ArduPilot SiK Telemetry Radio page (reproduced below ) to make sure power goes to the correct pins. I ignored the RTS and CTS pins and haven’t encountered any issues.
If you’re not familiar with soldering or electrical wiring work ask a friend or watch instructional videos on YouTube. Always tin wires before soldering them together, and insulate solder joints individually with heat shrink.
Software
An example iPhone and iPad primary flight display app compatible with the aforementioned hardware setup is available from my GitHub. Follow the brief instructions in the README.md to get the app running.
Read on if you’d like to learn more about how an iOS app can communicate with an SiK radio via a BLE Mini. For the fine details please refer to the example app source code.
BLE Mini Bluetooth Peripheral
Out of the box the BLE Mini performs the function of a Bluetooth peripheral. There are four universally unique identifiers (UUID) for the BLE mini which are crucial.
let RBL_SERVICE_UUID   = "713D0000-503E-4C75-BA94-3148F18D941E"
let RBL_CHAR_TX_UUID   = "713D0002-503E-4C75-BA94-3148F18D941E"
let RBL_CHAR_RX_UUID   = "713D0003-503E-4C75-BA94-3148F18D941E"
let RBL_CHAR_BAUD_UUID = "713D0004-503E-4C75-BA94-3148F18D941E"
RBL_SERVICE_UUID identifies a simple TX / RX peripheral service on the BLE Mini for exchanging data with the serial port. The first task for an iOS app will be to scan and connect to a Bluetooth peripheral which advertises a service with this UUID.
RBL_CHAR_TX_UUID and RBL_CHAR_RX_UUID identify characteristics of the service which bridge reading and writing for the serial port.
The final RBL_CHAR_BAUD_UUID identifies a characteristic which when written to alters the baud rate of the BLE Mini serial port.
Scanning and Connecting to BLE Mini
When the Core Bluetooth central manager on the iOS device has powered on, you’re free to start scanning for the BLE mini TX / RX service. By restricting the scan to RBL_SERVICE_UUID other Bluetooth peripherals are filtered out.
let services:[CBUUID] = [CBUUID(string: RBL_SERVICE_UUID)]
centralManager.scanForPeripheralsWithServices(services, options: nil)
When a peripheral with the RBL_SERVICE_UUID is detected, the Core Bluetooth central manager delegate method centralManager(_:didDiscoverPeripheral:advertisementData:RSSI:) is called to notify the app. At this point you can connect to the BLE Mini or present a list to the user to select from. In either case you’ll be connecting to the a CBPeripheral at some stage with the following API method.
centralManager.connectPeripheral(peripheral, options: nil)
BLE Mini Service Characteristics
When the peripheral successfully connects, the Core Bluetooth central manager delegate method centralManager(_:didConnectPeripheral:) is called to notify the app. At this point we need to ask the connected CBPeripheral to discover the same service RBL_SERVICE_UUID, which is repetitive but necessary.
func centralManager(central: CBCentralManager, didConnectPeripheral peripheral: CBPeripheral) {
  ...
  peripheral.delegate = self
  peripheral.discoverServices([CBUUID(string: RBL_SERVICE_UUID)])
  ...
}
Once the peripheral discovers the service, the Core Bluetooth peripheral delegate method peripheral(_:didDiscoverServices:) is called to notify the app. At this point we ask the peripheral to discover the TX / RX and baud rate characteristics of the service. These will facilitate communication with the serial port on the pin headers of the BLE Mini.
func peripheral(peripheral: CBPeripheral, didDiscoverServices error: NSError?) {

  ...

  for service in peripheral.services! {
    let theCharacteristics = [
      CBUUID(string: RBL_CHAR_RX_UUID),
      CBUUID(string: RBL_CHAR_TX_UUID),
      CBUUID(string: RBL_CHAR_BAUD_UUID)]
    peripheral.discoverCharacteristics(theCharacteristics, forService: service)
  }
}
Once the peripheral discovers a requested characteristic, the Core Bluetooth peripheral delegate method peripheral(_:didDiscoverCharacteristicsForService:error:) is called to notify the app. The discovered characteristics should be stored for later use. Notifications for the TX characteristic should be enabled so that the app is notified when new data from the serial port has arrived.
func peripheral(peripheral: CBPeripheral, didDiscoverCharacteristicsForService service: CBService, error: NSError?) {
  ...
  for characteristic in service.characteristics! {
    // Store the characteristic
    self.characteristics[characteristic.UUID.UUIDString] = characteristic
  }

  // App is notified as new serial port data arrives
  if let char = self.characteristics[RBL_CHAR_TX_UUID] {
    self.activePeripheral?.setNotifyValue(enable, forCharacteristic: char)
  }
}
Receiving Data
As new data arrives from the serial port, the Core Bluetooth peripheral delegate method peripheral(_:didUpdateValueForCharacteristic:error:) will be called to notify the app.
func peripheral(peripheral: CBPeripheral, didUpdateValueForCharacteristic characteristic: CBCharacteristic, error: NSError?) {

  ...
  if characteristic.UUID.UUIDString == RBL_CHAR_TX_UUID {
    // Decode the data to get a MAVLink message
    let data: NSData? = characteristic.value.value
  }
}
To decode the MAVLink message from NSData refer to my previous article Decoding MAVLink Messages with Swift.
Writing Data
Writing data to the serial port is accomplished by writing NSData to the RBL_CHAR_RX_UUID characteristic.
func write(data data: NSData) {

    guard let char = self.characteristics[RBL_CHAR_RX_UUID] else { return }
    self.activePeripheral?.writeValue(data, forCharacteristic: char, type: .WithoutResponse)
}
Conclusion
I hope this article was helpful and informative. When I first started working with the Pixhawk autopilot I was frustrated that I couldn’t use my iPhone as a development platform. I’m glad to have finally solved that problem.
If you have any questions please do get in touch.